Friday, December 28, 2012

Inexpensive Greenhouse Living

Today I went on a little tour of Korean Green Houses turned Living Space.  It is popular practice to convert plastic (or vinyl) metal frame green houses into temporary and even permanent living spaces.  I had an opportunity to check out one generous man's home up close. He was kind enough to not only let me walk around his home freely but he also spent a great deal of time explaining the process.

This is what the house looks like from the street- just a green house, right?


Here is the entrance. There is a locking door which leads to the greenhouse and a walkway that leads to  living space in the rear.
The black blocks stacked near the entrance are round blocks of coal which are used in the stove for cooking and heating the interior of the home.


On the right of the path, there is a smaller greenhouse in which the family grows cabbage and onion. 


The smaller building out back, is used for drying vegetables and there is a homemade barrel stove for heating water and cooking.


This is the entrance to the smaller house that belongs to a relative.  As you can see if you look closely, the front structure is a typical greenhouse, but there is a mud brick pathway inside that leads to the second structure which holds the living space. It is covered with a special sandwich of fabrics to keep the environment, dry, warm in the winter and cool in the summer.


These are the hens who provide a steady flow of eggs. 


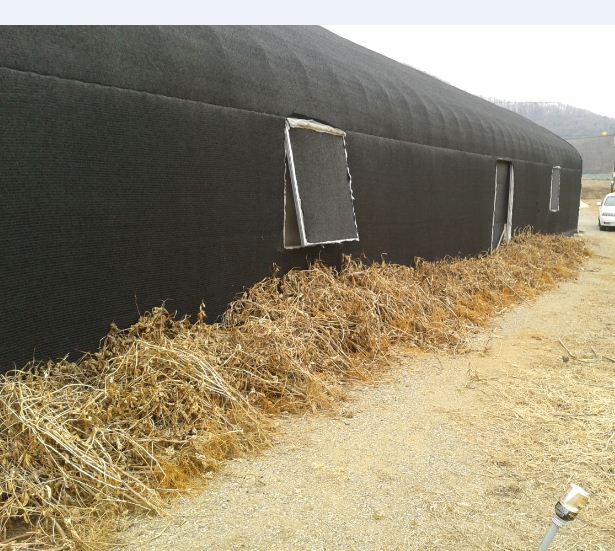
In the countryside, there were many of these vinyl homes. Some more neatly wrapped than others.  The owner of the first home explained that the house is covered in a sandwich of layers composed of  (from inside out) a couple of layers of low loft cotton tarp, a heavy duty plastic tarp, a kind of recycled high loft matting, more heavy duty plastic tarp and a layer of the black vinyl that you see in the picture below.  I was concerned that the black vinyl would cause the interior to become way too hot during the summer months but the Ajashi (old man) assured me that the purpose of the black tarp is to keep the sun out and the interior temperature cool.  He has no air conditioning and says that they are comfortable in the summer.  I did however, notice a fan.

This is the entrance to another house that we spotted on our drive. It was very neatly trimmed.  There were even windows that opened and a side door as well as a back door.


I'm not quite sure why all the dried vegetation was clumped up around the base of the house.  


I wanted to see inside but unfortunately, no one was home. 


This is the back of the house.  It appears that the poles for the porch are ready to be covered in  tarp.

If you'd like to see a video of our tour inside one of these, you can watch it here: http://www.youtube.com/watch?v=wehFUgGpp-M&feature=youtu.be   and here: http://www.youtube.com/watch?v=uAslfeES2jU 

Homemade Shower Scrub and Bath Salts

I made these shower scrubs (AKA bath salts) to give as Christmas presents to my co-workers.  Many of them don't have tubs so, I adjusted the ingredients for use in the shower instead.  Usually, for the tub, I use a larger salt crystal that takes longer to dissolve.  For the scrubs, I used a large but finer grain of salt. That dissolves not as easily as your typical table salt, but faster than the bath salt. 

You'll need the following ingredients:  Salt, food coloring, grape seed oil (or other carrier oil of your choice), essential oils and  clean containers with lids.  In all honesty, I have to say that this time, I had to make such a large amount that I didn't really pay much attention to my measurements.  I go by touch, appearance and smell but for those of you new to the craft, I'll give you some basic guidelines to start with.

First, take about 3-4 cups of coarse salt (epson is fine) for a scrub or rock salt for the bath.  You can use either of these in the bath but the larger crystals dissolve more slowly. Therefore, the smaller crystals are more suitable for the shower.


Next, mix your oil and food coloring.  Once the solution is mixed well, add it to your salts.  Gradually stir the oil and color into the salts until all of the crystals are completely covered. Use a plastic or wooden spoon to avoid any reactions that may occur using metals.


I like rich vibrant colors.  I call this mix Manderine Rose. It smells divine.  After adding the carrier oil and color, I add my essential oils  (approximately 10-15 drops total) depending on my choosen fragrance. 


I usually crumble dried herbs and/or flowers into the mix.  This adds to the fragrance, helps to bind and hold the scent and adds nice color, texture and extra exfoliation properties. These lavender petals were added to my Lavender salts.


This blend is comprised of Lavender and Rose essential oils with a bit of vanilla.  Sooooo, nice. 


I recycle glass jars, make my own labels and I use either recycled  fabric or in this case, wrapping paper printed on recycled paper from prints found on the internet.  Simply fill your containers, add a label and a lid, cover with the paper or fabric, then a rubber band and some string or ribbon.  There you have it.  Everything I needed for this project was already in my home.  Well, except for the wrapping paper prints.

Notes:  For shower use, you may want to use shatter proof containers for safety purposes.  I use the glass but I'm extra careful and only scoop out what I'm going to use into a small wooden dish.  

Off-Grid Heating and Cooking the Asian Way

The art of cooking off-grid is no stranger to the people of Asia.   Japan and South Korea have a long history of the utilization of mud/clay  wood fueled cook stoves which heat the home as well.  In Korea, floors are kept cozy with a type of heating called on-dol.  This is where pipes from the stove run the course of the house and provide toasty warmth to cold toes through the floor.  

In the above photos, all of the stoves are Korean except for the one in the lower right corner. That particular stove is Japanese.

My preference is for the stove in the top right corner. However, my plan is to use standard rocket stove construction as a base in an attempt to limit the need for firewood.  Rocket stoves burn more effectively therefore, utilizing much less fuel.

Here is a diagram of how ondol technology works vs that of the rocket stove:


Rocket Stove:

On the rocket stove, There are people who have actually run pipes from their rocket stoves underneath the flooring to create heating much like that of the traditional Korean ondol. Check out this link to see a video: http://www.permies.com/t/5831/stoves/underfloor-heating-system-rocket-mass


An Experimentation with LED Battery Powered Lights

It's been awhile but I'm back.  I've been experimenting with various off-grid lighting sources. Today, I decided to see which method would bring me the most light between a basic candle and an led battery powered light bulb or two.   Here are the pics, you be the judge:


I'm using the Awa led light bulb made in South Korea.  It has a sturdy base and an on/off switch on the side of the base.  The bulb comes with an adhesive as well as a bracket for more permanent mounting.   The lights don't compare to your standard incandescent bulb but it's enough light to make a cup of tea and to read by.  It lights my tiny bathroom well enough to function within it properly. However, I wouldn't trust it for make-up application or more intricate work (whatever that may be).  

With one bulb, you have some light. With two or more, ah, more, of course.  I'm happy that they use very little power and they're cool to the touch.  They're inexpensive ( I paid about $6 U.S.) but it depends on where you purchase them.  I have not seen these particular lights online in the U.S.  However, you can order them from Korea.  The similar bulbs sold in the U.S. via Amazon just don't measure up as they aren't as bright and they are quite flimsy.

If you'd like to see the video, check out my youtube channel: http:http://www.youtube.com/watch?v=_4hY8qAotPg

Tuesday, May 1, 2012

Solar Powered Generator Kit

So, I got a call this morning from a relative who'd watched a program featuring this plug and play solar powered generator kit.  


The kits sells for about $1800. U.S. and it is only sold in the United States. There's a video and more info here

 I did a little looking around and found that you could probably put together your own kit and or find a comparable one that works pretty much the same.

Solar Home also carries similar generators.

I also found this site which teaches you how to make your own solar generator for $300!
$300 DIY Solar Generator

Monday, April 30, 2012

Thoughts about LIving Off Grid

It's interesting that most people think of living off grid as strange or extreme.  It saddens me to think about how difficult it is to truly live the, "American Dream".  Despite the state of the economy, many brave individuals have proven that living this way is not only healthier, smarter and better for the environment, but also that it is very doable on a small budget. Unfortunately, there are many unbelievably ridiculous obstacles preventing others, who so desire, from living self-sufficient lives. 

I recently watched Garbage Warriors, the documentary featuring architect Michael Reynolds' three year journey through off-grid earth-ship pioneering hell and back. 


It's very long but well worth it.  You can watch the documentary here.


Saturday, April 28, 2012

Eating Mild in South Korea

Korean Food is Spicy!  It's not Mexican food spicy, it's not Indian food spicy, it's not even Thai spicy but it's hot!  So, how can one with very low tolerance for spicy food survive in South Korea?  Well, Korea has a little secret- you can actually find milder cuisine.  Here are a few Korean dishes, some spicy, some not.

Bulgogi (Korean Style bbq beef) with rice and veggies, dumplings,naemyeong (cold noodle soup), sweet pickled radish and kimchi.  Except for the Kimchi, not spicy at all.

Department and Super Store Cuisine. This is what the plastic food looks like in the window.

This is what it actually looks like when you get it.
One of my favorites-kimbap (pretty much like Japanese sushi roll)- Unless you make a special request for it, not spicy.

Chum Chi (Tuna/Mayo)  Kimbap
This is absolutely wonderful! I love having this meal in the winter and/or when I'm feeling a little homesick.  It's almost like my grandfather's hearty chicken and dumpling stew. but without the dumplings and carrots. This dish can be ordered as mild as you like it. If you're at all interested in maintaining the use of your tongue and taste buds,  make sure you say, Waygookin (foreigner) mild not Korean mild.  Yeah, I learned that the hard way.

Black Chicken Soup-Mild without the noodles.

The same stew as above but made the traditional Korean way.  See the heat?  Can you feel it?
Korean Black Chicken Soup
The Korean sweet potato is served up in many ways. Here it's fried, honeyed and topped with almond slices and sprinkled with black sesame. 

Korean Sweet Potato
Korea is known for it's varied inexpensive street food.  You can find Dokkbokki (spicy rice noodle) almost everywhere.  I once actually came across one that I could eat without scorching my tongue but my stomach's rebuttal was very stern and unforgiving.
VERY SPICY! Dokkboki.
One of my favorite side dishes in a very mildly twangy steamed broccoli.

Korean-style broccoli
Very Delicious Ginseng Hen in a Crock- Mild too.

Sides- Salad, garlic, radish kimchi, white kimchi, pickled radish, peppers, soybean paste
Pickled Eggplant


Spicy Sesame Leaves (I can't eat this one)
Spicy Shredded Radish (Too spicy for me)

Bulgogi cooking at the table


The Yummy Chicken Soup again with the noodles but without all the spice.
The Waffle. Koreans love their sugary waffles topped with ice-cream.